When to use this route
Route 1 is recommended for users with little to no experience using the command line, and for small scale (usually 1-10 samples, but could be more) or infrequent submissions. It makes use of a combination of a web submission interface (Webin submission portal) and a command-line tool (Webin-CLI).
Data required for route 1
All of the data required to complete this submission can be downloaded together in a single zip file. In this part of the tutorial, we will make use of the information in the ‘01-route’ and ‘data’ subfolders.
Note: If you use your own data, you can fill in the metadata template, for instructions on how to do this, please see the Preparation for Submissions tab.
Doing a test submission vs a ‘real’ submission
ENA provides two sites for submission; one for test submissions and one for ‘real’ submissions (i.e. an actual submission to ENA). We recommend doing a test submission first, using the example data provided, in order to get an understanding of the different steps. Please note though, that the test service is refreshed every night. This means that any test submissions will be removed before the following day, so it is not possible to begin a submission one day and continue the next.
Install Webin-CLI
The Webin command line submission interface (Webin-CLI) is used to validate, upload, and submit raw reads and sequence assemblies. In order to use it, it must be installed alongside Java and a Java Runtime Environment. Follow the below instructions to complete the required installations:
-
Download Java version 1.8 or newer.
-
Download Zulu Open JDK for the Java Runtime Environment (JRE).
-
Download the Webin-CLI Java jar file from ENA GitHub repository. Put it in an easily accessible folder, e.g. Downloads. For convenience, create a path variable named DOWNLOADS in a terminal window using the below code:
export DOWNLOADS="/path/to/Downloads/"
The Webin submission portal
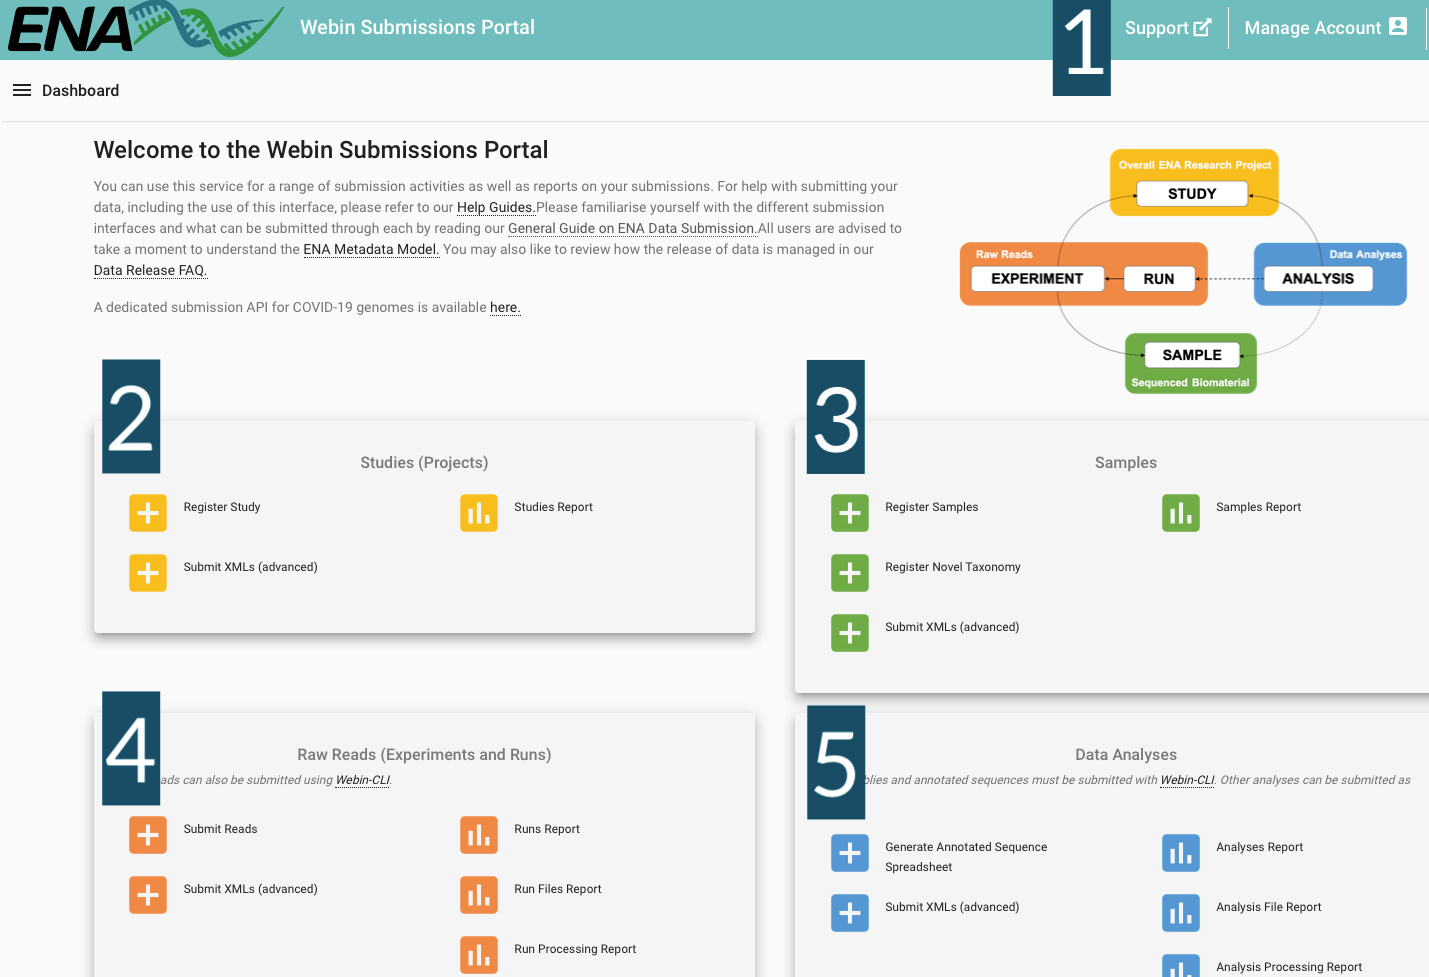
The Webin submission portal will be required to complete a Route 1 submission. You will need an account to access the portal, for instructions on how to do this, please see the Preparation for Submissions tab. After logging in, you will see the landing page (shown below) that includes multiple options for completing your submission. In this section, you can get more information on what each of the options do. The options that you will need to complete a submission using Route 1 are explained in the subsequent sections of this page.
-
Header Bar (Label 1 in the above figure): Use the Support option to request assistance from the ENA helpdesk. Click Manage Account to e.g. change your contact information or centre name.
-
Studies (Projects) (Label 2 in the above figure): All related options are coloured yellow. The Register Study option leads to an interface where you can register new studies. The Submit XMLs interface enables studies to be submitted in XML format. The Studies Report option allows you to review and edit previously submitted studies, and to change their release date.
-
Samples (Label 3 in the above figure): All related options are coloured green. The Register Samples option allows you to select and customise a sample checklist, download a template spreadsheet, and then upload a completed spreadsheet in order to register your samples. The Register Taxonomy option enables you to request that another taxa is added to the taxonomy database (in the event that your submission includes a taxa that is not currently included). The Studies Report option allows you to review and edit previously submitted samples.
-
Raw Reads (Experiments and Runs) (Label 4 in the above figure): All related options are coloured orange. The Submit reads option enables you to select a type of read data, download an appropriate template spreadsheet, and then upload a completed spreadsheet to register your read data. The Submit XMLs interface enables experiments and runs to be submitted in XML format. The Runs Report option allows you to review and edit previously submitted runs and experiments. The Run Files Report option allows you to review the status of files associated with previously submitted runs. The Run Processing Report option allows you to review the processing status of files associated with previously submitted runs. The Unsubmitted Files Report option allows you to review the status of unsubmitted files (before you can submit a run file, you must upload it to your accounts FTP area, and these are considered ‘unsubmitted’).
-
Data Analyses (Label 5 in the above figure): All related options are coloured blue. The Create annotated sequence spreadsheet option allows you to select, download, and customise a template that can be used to make a submission via Webin-CLI. The Submit XMLs interface enables analyses to be submitted in XML format. The Analyses Report option enables you to review and edit previously submitted analyses. The Analysis File Report option enables you to review the status of files associated with previously submitted analyses. The Analysis Processing Report option enables you to review the processing status of files associated with previously submitted analyses.
You can gain more information about how to use the options to complete the functions outlined above by clicking on them in the landing page at ENA submission portal.
How to do a route 1 submission
Register a study (project)
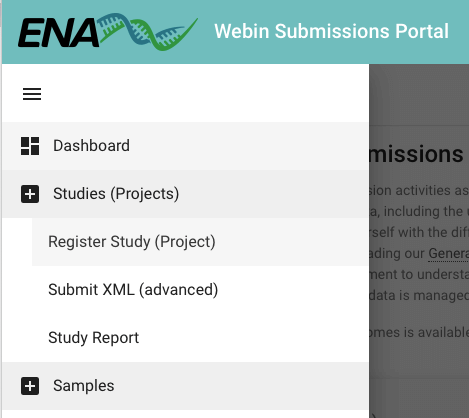
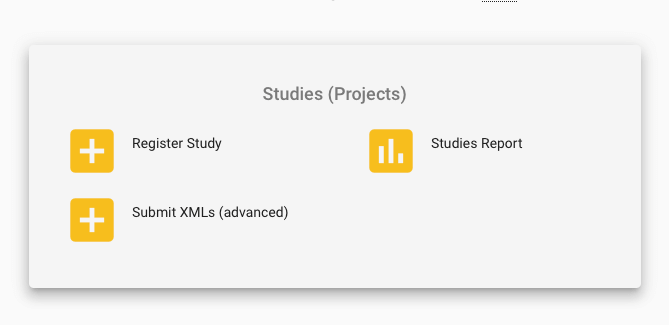
First, log in to the Webin submission portal test service with your Webin username and password. In the top left of the welcome page, there is a Dashboard menu that expands when you click on it. Click it and select Register Study (Project) (as shown in the first picture below), or click on the Register Study option in the Studies (Projects) section on the landing page. The options for ‘Study’ are shown in yellow on the welcome page. See label 2 in the image above to determine where the ‘Study’ options are on the welcome page, and refer to the second image below for a more ‘zoomed in’ image of the options.
Second, enter the details of the project, such as title and description. Asterisks (*) denote mandatory fields. The ‘Release date’ is the date that the record should become publicly available, provide an estimated date. The release date can be set to maximum of two years in the future, and is easy to update in order to either extend or shorten. When the release date is approaching (i.e. two weeks left), you will get an email from ENA with a heads up notification.
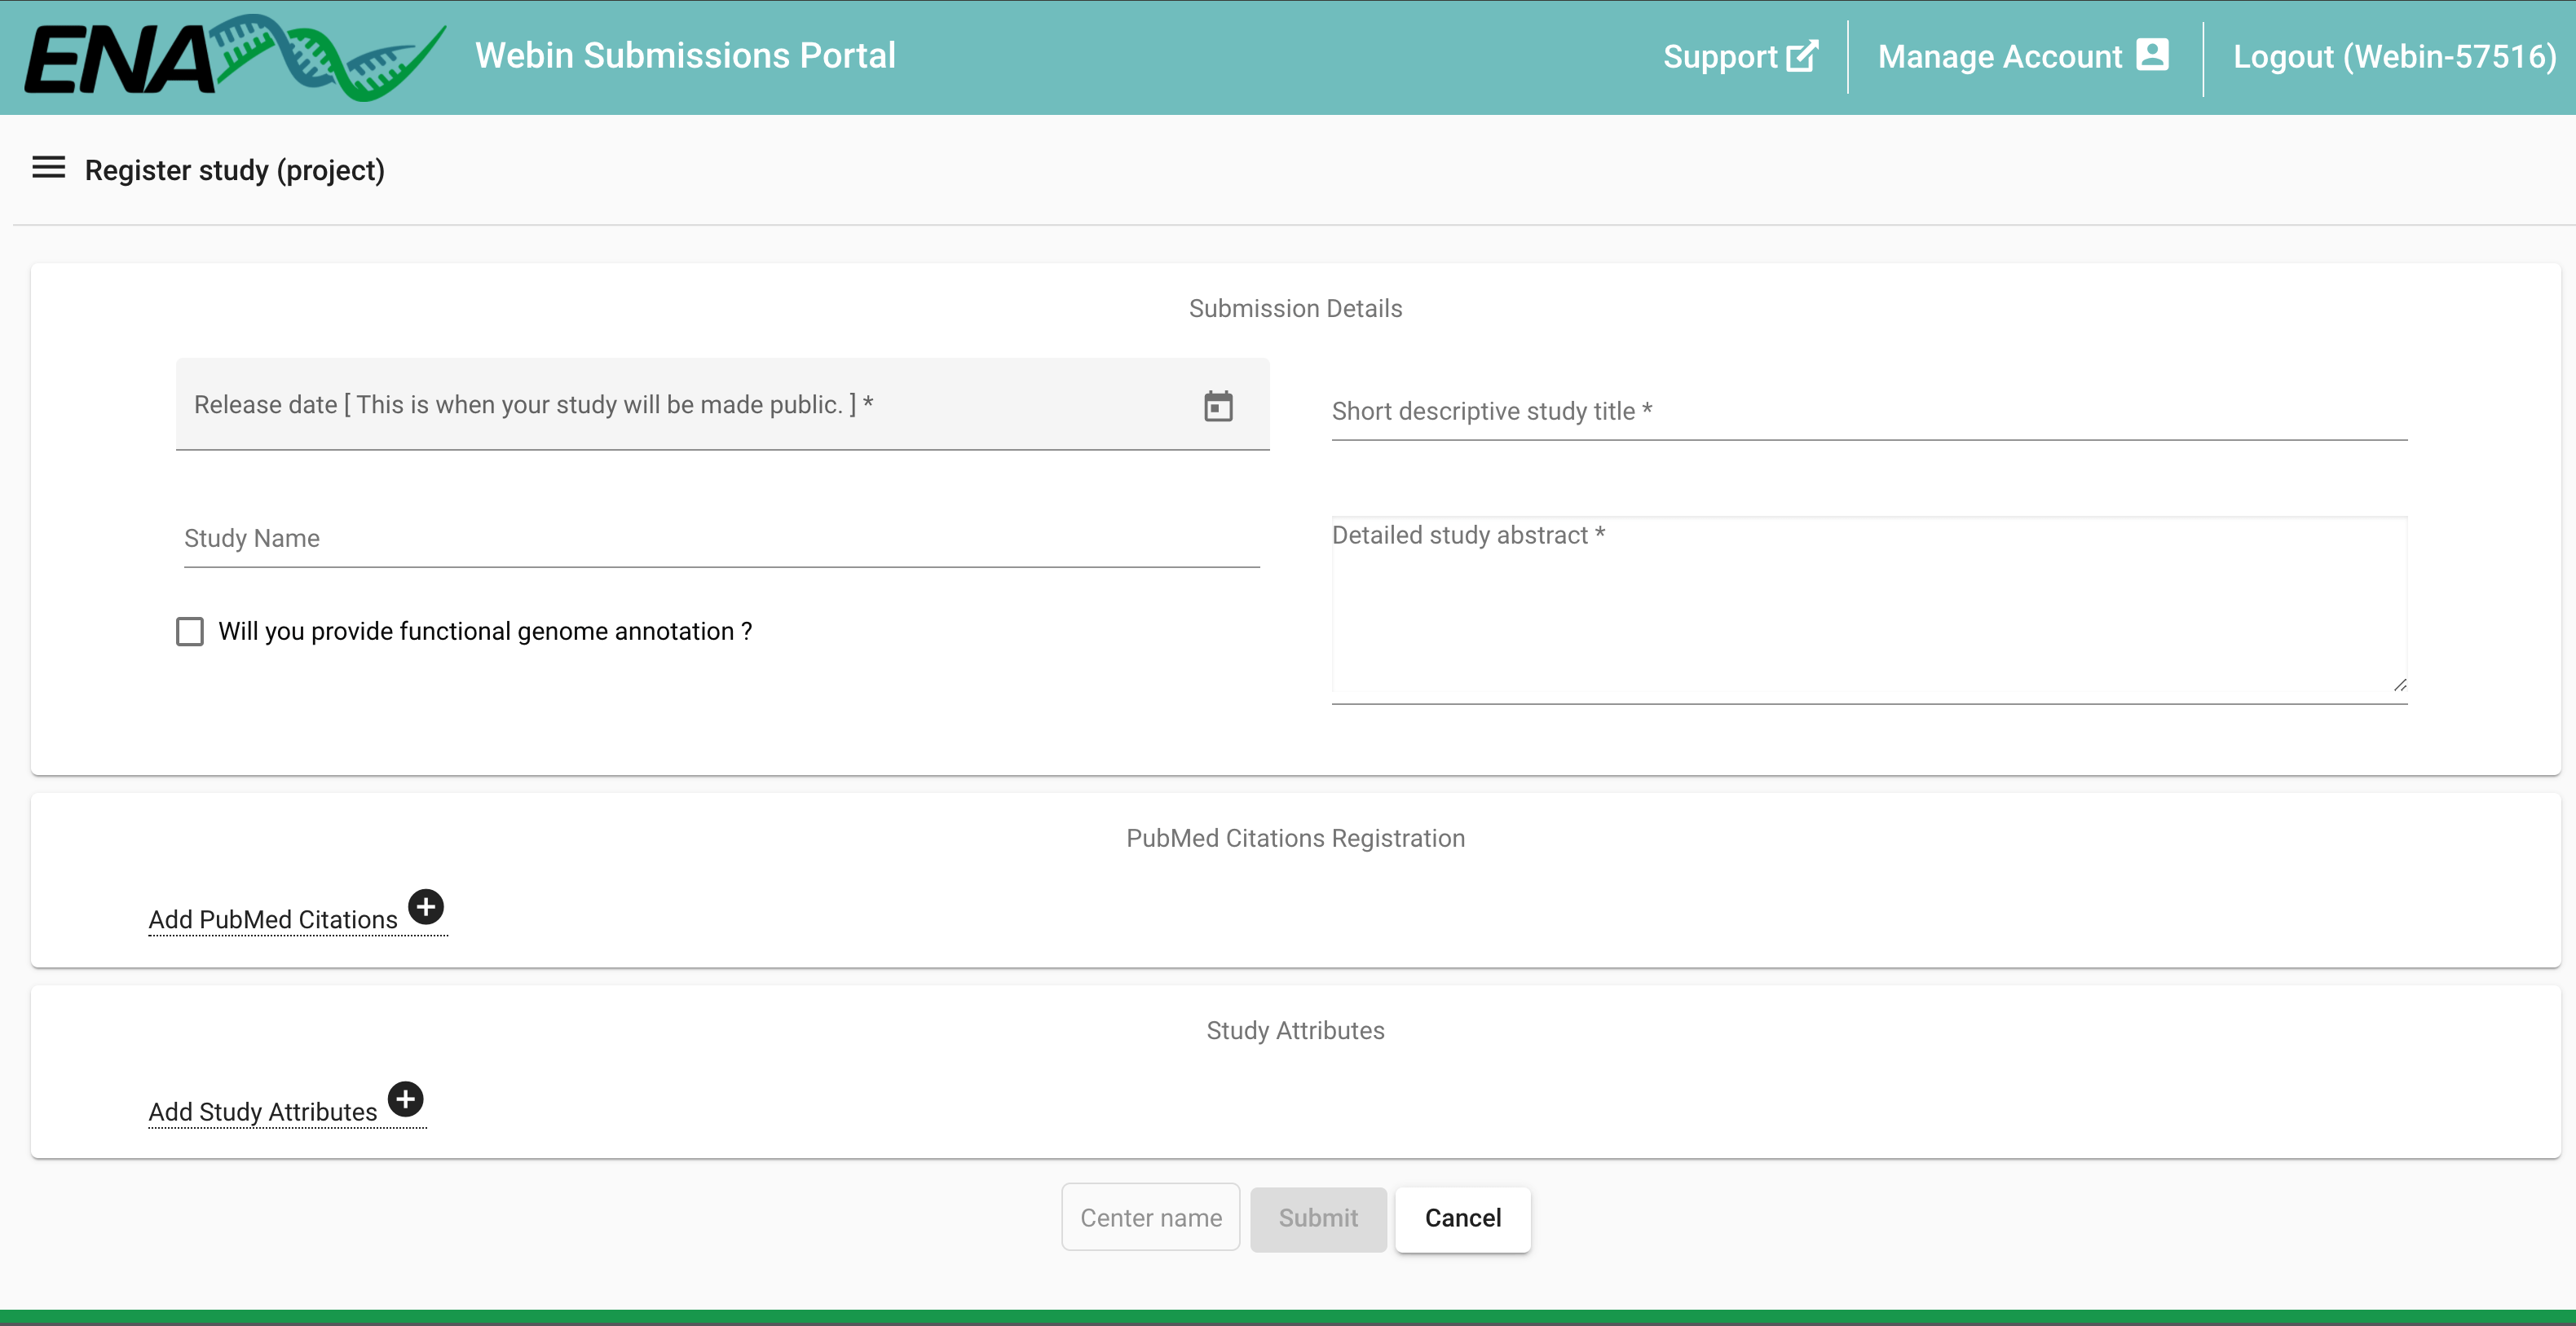
Lastly, click Submit. A pop-up window will appear, check that the submission was successful by reading the content of the window, then click Close.
Please see this video by ENA for further guidance on how to register studies using the Webin Submissions Portal.
Prepare information for samples
Before registering the samples, you must prepare the spreadsheets for submission. For instructions on how to do this, please see the Preparation for Submissions tab.
The information that you need to provide will differ depending on e.g. the type of sampling done. Some fields are mandatory, whilst others are recommended or optional (summarised in the below image). The ENA provides a virus pathogen metadata checklist (ERC000033) that should be used for submission of SARS-CoV2 samples.
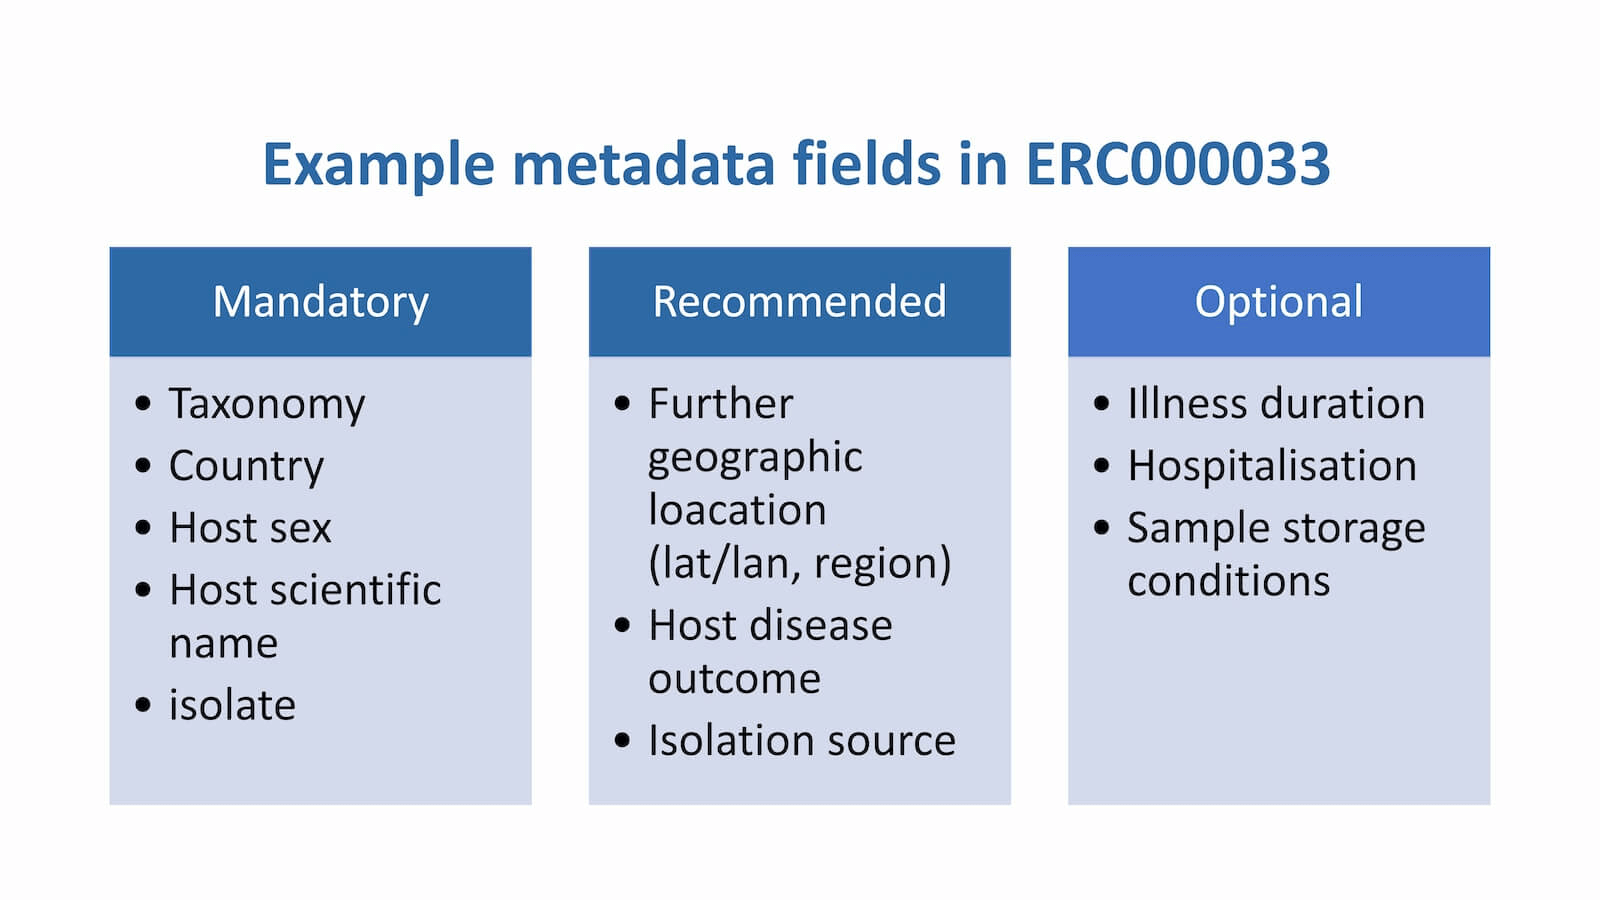
The above image is adapted from one produced by Sam Holt for the ENA Facility Day 2020. Click here for information about missing values in mandatory metadata fields
Submit samples
You can register samples either by clicking on the Dashboard menu (top left of the page, refer to images in the above section) and selecting Register Samples or by clicking on the Register Samples option in the Samples section of the landing page (all related options in green).
Both of the above options lead to the same place, which gives two options: (1) Download spreadsheet to register samples, and (2) Upload filled spreadsheet to register samples.
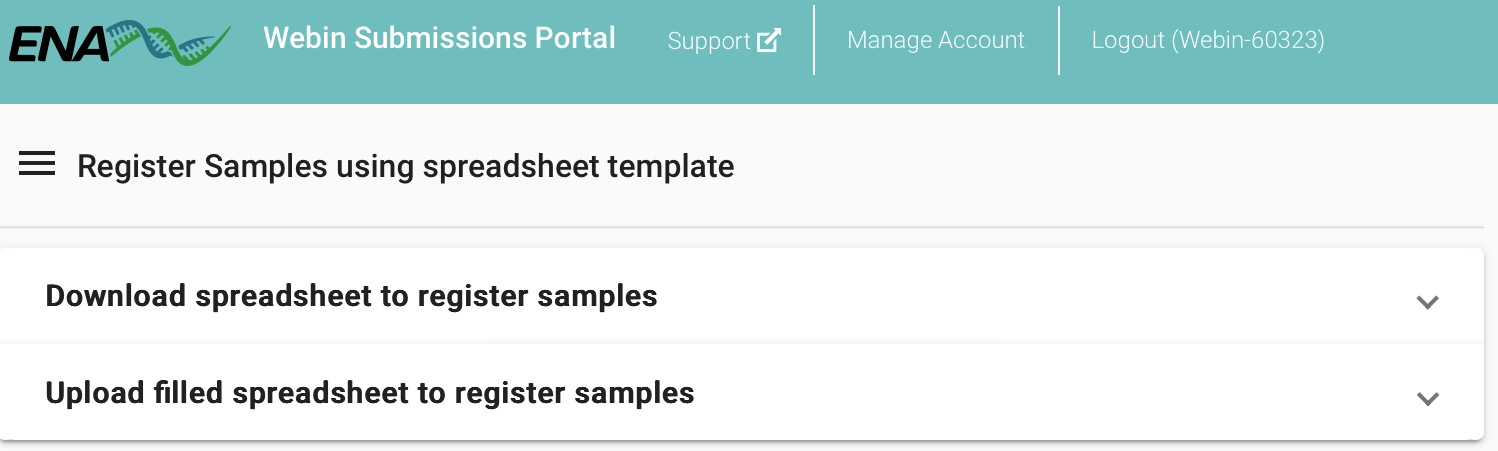
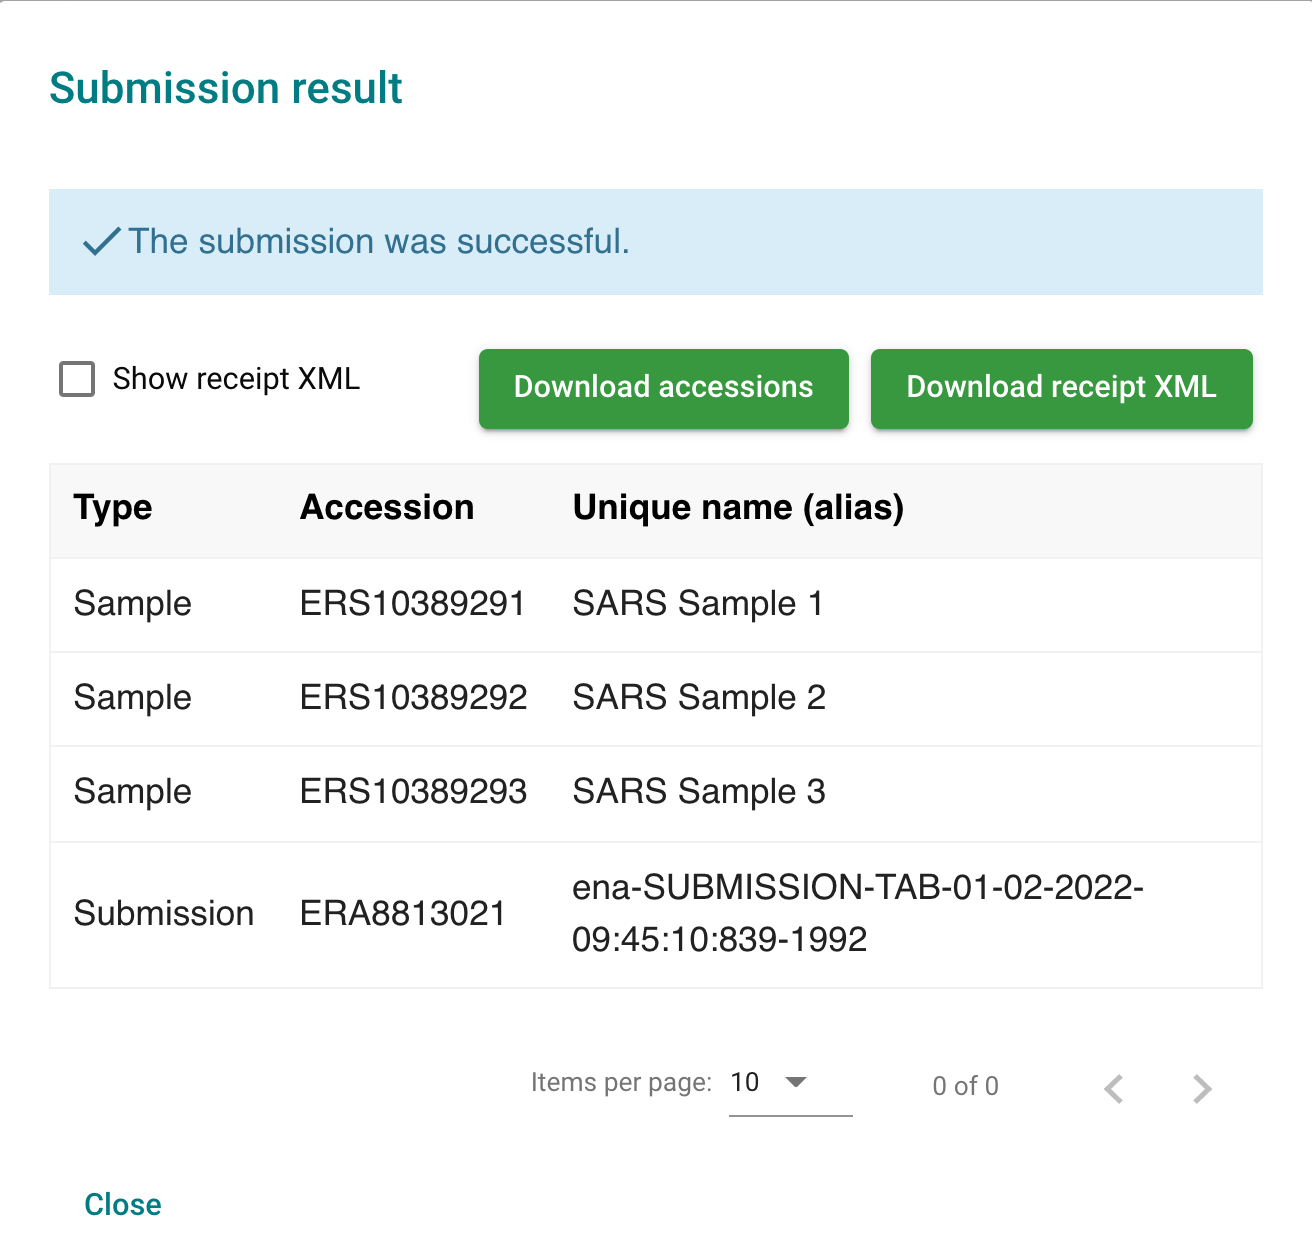
Select the latter and upload the filled sample template that you made when preparing your submission. Click on Submit Completed Spreadsheet, verify that the submission was successful in the pop-up Submission window, and then click Close.
Note: Example data for three samples is provided in the ‘data/samples/’ folder of the example data provided with this tutorial in both .xlsx and .tsv formats. ‘sample_spreadsheet.xlsx’ is annotated such that different features are colour coded, and important features are highlighted. ‘sample_spreadsheet.tsv’ contains the same data in a tab-separated format, which is the format accepted for submission. Each row of these datasets represents a sample, while each column represents a metadata field.
Submit raw reads
Explore the example data
In this section, we will use the materials in the runs subfolder of the route-01 folder of the example data that you downloaded earlier.
To view the contents of this folder, you can open it using a file explorer or using a command line interface. To do the latter, open a command prompt window (Terminal) on your computer and navigate to the runs subfolder. You can do this by typing cd in the terminal followed by the filepath (depicted as ‘$WORKSHOP/01-route/runs/’ in the example below). Then, on a new line (that you can create by pressing ’enter’ on your keyboard), type ls. The content of the subfolder will then be listed.
cd $WORKSHOP/01-route/runs/
ls
Note: Windows users should replace the forward slashes (/) in the code above with backslashes (\).
This subfolder contains three manifest files, each named ‘paired_fastq_manifest_sample*.txt’ (where * represents a number between 1 and 3). These manifest files contain the metadata for raw read files, which is used to connect the samples with the raw sequences. Preparation of such manifest files are key when submitting raw reads.
Prepare manifest files
A manifest file includes details on how the sequencing was done and on which sample. Manifest files consist of two columns separated by a tab (or any white-space characters). The first column includes metadata field names, and the second column represents the corresponding value. Below, we list the metadata field names that can be included in manifest files and the type of value that can be provided for them:
- STUDY - Study accession or unique name (alias)
- SAMPLE - Sample accession or unique name (alias)
- NAME - Unique experiment name
- PLATFORM - Refer to ENA to see permitted values
- INSTRUMENT - Refer to ENA to see permitted values
- INSERT_SIZE - Insert size for paired reads
- LIBRARY_NAME - Library name (optional)
- LIBRARY_SOURCE - Refer to ENA to see permitted values
- LIBRARY_SELECTION - Refer to ENA to see permitted values
- LIBRARY_STRATEGY - Refer to ENA to see permitted values
- DESCRIPTION - Free text library description (optional)
- FASTQ - Single fastq file (compressed)
The above information was taken from documentation by ENA
Manifest files can be created using a text editor of your choice (e.g. Notepad). Open one of the manifest files in the runs subfolder of the example data (e.g. paired_fastq_manifest_sample1.txt) to see an example of a typical manifest file for SARS-CoV-2 sequence data. Note though, that the field values might differ for your own project.
It is important to note that you need to create one manifest file per sequence file. We recommend creating a template manifest file in which all field values that are shared between all the samples in your submission are pre-filled (e.g. STUDY, INSTRUMENT, LIBRARY_SOURCE). This will save time when producing the manifest files.
The field values for STUDY and SAMPLE are taken from the study and samples metadata objects that you submitted earlier:
-
Go to the Webin submission portal, open the Dashboard menu (top left of the submission portal page), and click on Studies Report. Copy the accession number (which will start with PRJEB) and insert it into the manifest file as the value for the STUDY metadata field.
-
Go to the Webin submission portal, open the Dashboard menu (top left of the submission portal page), and click on Samples Report. Find the accession number (which will start with ERS) for the sample that the associated sequence file belongs to. Copy that accession number into the manifest file as the value for the SAMPLE metadata field.
Submit using Webin-CLI
Open a command prompt window and navigate to the runs subfolder of the 01-route folder of the example data files, using the cd command (e.g. cd $WORKSHOP/01-route/runs/). Remember to use \ instead on Windows.
The Webin-CLI requires that you provide information about who you are and what you want to do before use. You can do this by using one of the available ’options’. In the command prompt window, type in the appropriate command from the list below to see the available options. Please note that the filepath should give the location of Webin-CLI. Below, it is assumed that a path variable (‘DOWNLOADS’) has been created that contains the full path to the folder where the program was downloaded. See the Preparation for Submissions tab on how to do this.
- On Windows - java -jar $DOWNLOADS\webin-cli-7.0.1.jar -help
- On Mac - java -jar $DOWNLOADS/webin-cli-7.0.1.jar -help
You’ll see that multiple options are available. You will use the following:
-context: the submission type (reads).-userName: the Webin submission account name.-password: the Webin submission account password.-manifest: the manifest file name.-outputDir: directory for output files.-inputDir: input directory for files declared in manifest file.-validate: validates the files defined in the manifest file.-submit: validates and submits the files defined in the manifest file.-test: use Webin test service instead of the production service.
The above definitions were taken from ENA documentation, where you can also find more information about the command line options available for Webin-CLI.
You will first use the -validate and -test options to perform a validation against the test server. Use the $WORKSHOP\data\raw folder as the input directory, and $WORKSHOP\01-route\runs as output directory. Use the commands below to do this. Remember to modify the commands according to your filepath, and to replace Webin-XXX and myPassword with your own account credentials:
-
Windows
java -jar $DOWNLOADS\webin-cli-7.0.1.jar -context reads -userName Webin-XXXXX -password myPassword -manifest $WORKSHOP\01-route\runs\paired_fastq_manifest_sample1.txt -outputDir $WORKSHOP\01-route\runs -inputDir $WORKSHOP\data\raw -validate -test -
Mac
java -jar $DOWNLOADS/webin-cli-7.0.1.jar -context reads -userName Webin-XXXXX -password myPassword -manifest $WORKSHOP/01-route/runs/paired_fastq_manifest_sample1.txt -outputDir $WORKSHOP/01-route/runs -inputDir $WORKSHOP/data/raw -validate -test
Once your command is entered correctly into your command prompt window, press ‘Enter’ on your keyboard. If the validation was successful, the last line of the resultant output will read:
INFO : The submission has been validated successfully.
If the validation fails, a message will direct you to a report file. The report file will contain a list of error messages that explain the reason for the failure. Please use the information in this report file to address any faults before re-attempting the validation step.
After a successful validation, you can now perform a test submission (using the -submit option in place of the -validate option in the commands listed above). The processing at this stage could take a while, but errors are unlikely, and may only result from the upload of the sequence file.
If the submission is successful the last output row will read:
INFO : The submission has been completed successfully.
The assigned accession number will also be displayed. As with failed validation, a failed submission results in the provision of directions to a report file that explains the errors.
When doing a real submission to ENA, you use the same commands as those given above (modified as indicated) but with the -test option removed from the commands.
Submit sequence assemblies
Explore the example data
In this section, we will use the materials in the sequences subfolder of the route-01 folder in the example data that you downloaded earlier.
To view the contents of this folder, open it using the file explorer or a command line interface. To do the latter, open a command prompt window (Terminal) on your computer and navigate to the sequences subfolder. Do this by typing cd followed by the filepath (depicted as $WORKSHOP/01-route/sequences/ below). Press enter, then type ls and press enter again. The content of the subfolder will then be listed in the window.
cd $WORKSHOP/01-route/sequences/
ls
Windows users should replace / in the above with \.
In the folder, you’ll see that there are three manifest files (named ‘hCov-19_isolate_*_manifest.txt’, where * is a number between 1 and 3); one for each of the 3 example sample data files. The manifest files contain information about the corresponding sequence, including the name of the FASTA file containing that sequence.
There are 6 files in the subfolder in the example data $WORKSHOP/data/sequences/; one FASTA sequence file and one chromosome list file for each of the three samples. The chromosome list file defines the list of ‘chromosomes’, in the case of SARS-CoV-2, we simply list the sequences as ‘chromosome 1’. Please remember that the sequences must be given a unique name within the submission that is provided in the FASTA files. It is essential that the sequence names in the FASTA files are used also in the corresponding chromosome list files.
Prepare manifest files
Manifest files, which provide information about data files, need to be prepared before a submission. Manifest files comprise of two columns separated by a tab (or any white-space characters). The first column contains a field name, whilst the second contains the corresponding value. The following metadata field names can be used in the manifest file:
- STUDY - Study accession or unique name (alias).
- SAMPLE - Sample accession or unique name (alias).
- ASSEMBLYNAME - Unique assembly name.
- ASSEMBLY_TYPE - For SARS-CoV2 assembly_type is ‘COVID-19 outbreak’.
- COVERAGE - The estimated depth of sequencing coverage.
- PROGRAM - The assembly program used.
- PLATFORM - The sequencing platform, or comma-separated list of platforms.
- MINGAPLENGTH - Minimum length of consecutive Ns to be considered a gap (optional).
- MOLECULETYPE - For SARS-CoV2 molecule type will be either genomic RNA or viral cRNA, depending on your library preparation strategy.
- DESCRIPTION - Free text description (optional).
- RUN_REF - Comma separated list of Run accession number(s) corresponding to the raw read data it was built from (if available).
- FASTA - Single FASTA file (compressed format).
- CHROMOSOME_LIST - Chromosome list file (compressed format).
The above information was adapted from documentation from ENA
The manifest file can be created in a text editor (e.g. Notepad) of your choice. You can use one of the manifest files in the example data folder (that you downloaded earlier for this tutorial) as a reference when making your own manifest file for SARS-CoV-2 sequence data. Please note though, that the field values might differ for your own project.
As you need to create one manifest file per sequence assembly file, we recommend making a template manifest file that you can use as a basis to create all the manifest files that you require. In such a template, you could pre-fill all of the metadata field values that are shared between all samples included in your submission (e.g. STUDY, PLATFORM, MOLECULETYPE). Then, you need only fill in the values that differ when you create a new manifest file.
The field values for STUDY, SAMPLE, and RUN_REF (if raw reads have been submitted) need to be collected from the study, sample, and ‘raw’ reads metadata objects that you submitted earlier:
-
Log in to the Webin Submissions Portal, go to the Dashboard menu (top left of the page), and click on Studies Report. Copy the accession number (starting with PRJEB) and then paste the accession number into the manifest file as the STUDY field value.
-
Go back to the Dashboard menu (top left of the Webin Submissions Portal) and click on Samples Report. Find the accession number (starting with ERS) for the sample that the sequence file belongs to. Copy this and paste it into the manifest file as the SAMPLE field value.
-
Only needed if you have previously submitted the related raw reads - go to the Dashboard menu (top left of the Webin Submissions Portal) and click on Runs Report. Locate the accession number(s) (starting with ERR) for the raw read(s) that the assembly sequence file is based on. Copy the number(s), and paste it/them into the manifest file as the RUN_REF field value (separate with comma).
Submit using Webin-CLI
In a command prompt window, type the command cd followed by the filepath to the sequences subfolder of the example data that you downloaded earlier (e.g. cd $WORKSHOP/01-route/sequences/). Windows users should use \ in place of /.
You then need to ’tell’ Webin-CLI who you are and what you want to do. This can be done using ‘options’. You can use the below commands to view the available options:
- On Windows - java -jar $DOWNLOADS\webin-cli-7.0.1.jar –help
- On Mac - java -jar $DOWNLOADS/webin-cli-7.0.1.jar -help
In the above commands, you need to provide the location of Webin-CLI. Here we assume that ‘DOWNLOADS’ has been created as a path variable, which contains the full path to the folder where the program was downloaded. See the Preparation for Submissions tab for information on how to do this.
You will make use of following options:
-context: the submission type (genome).-userName: the Webin submission account name.-password: the Webin submission account password.-manifest: the manifest file name.-outputDir: directory for output files.-inputDir: input directory for files declared in manifest file.-validate: validates the files defined in the manifest file.-submit: validates and submits the files defined in the manifest file.-test: use Webin test service instead of the production service.
Adapted from ENA documentation that also provides more details regarding the command line options of Webin-CLI.
You will use the -validate and -test options to complete a validation to the test server. When doing this, use $WORKSHOP\data\sequences folder as the input directory, and $WORKSHOP\01-route\sequences as the output directory. Input the appropriate command from below into your command prompt window. Remember to replace both Webin-XXX and myPassword, with your own account credentials:
-
Windows
java -jar $DOWNLOADS\webin-cli-7.0.1.jar -context genome -userName Webin-XXXXX -password myPassword -manifest $WORKSHOP\01-route\sequences\hCoV-19_isolate_1_manifest.txt -outputDir $WORKSHOP\01-route\sequences -inputDir $WORKSHOP\data\sequences -validate -test -
Mac
java -jar $DOWNLOADS/webin-cli-7.0.1.jar -context genome -userName Webin-XXXXX -password myPassword -manifest $WORKSHOP/01-route/sequences/hCoV-19_isolate_1_manifest.txt -outputDir $WORKSHOP/01-route/sequences -inputDir $WORKSHOP/data/raw -validate -test
Press Enter. If the validation was successful, the last row of the output will read:
INFO : The submission has been validated successfully.
If the submission fails, you will be directed to a report file. The report file will contain a list of error messages that explain the reason for the failure. You can address any issue(s) before re-attempting the validation.
If a validation is successful, you can do a test submission (this is done by using the -submit option in place of -validate in the commands given above). Continue using the test server (by keeping the -test option), and keep the same input and output directories as for the validation option.
When you move on to doing a real submission, use the same commands as those given above but with the -test option removed. If you have multiple manifest files, you can put the commands in a script file instead, so that the process can run automatically. See for example $WORKSHOP/01-route/sequences/manifest_upload.sh in the example data.
What happens after submission
Once the submitted sequence assemblies have been processed, they will be distributed as EMBL flat files, see this example from ENA to understand the format. These files largely consist of:
- Metadata, such as author names and addresses (contained in lines beginning with
R, e.g.RA,RL,RG) - Sample information, located inside a
sourceblock - The sequence itself
Upon generation of the EMBL file, sequences also acquire a sequence accession number. This accession number will consist of 2 upper case letters followed by 6 numbers, e.g. LR991698.
For each assembly submission, Webin will report a unique accession number (starting with ERZ). For most assemblies, this number is only used for internal processing and will not be visible in the browser. However, for SARS-CoV-2 assemblies, the ERZ records will also be available in the browser to provide a point of access for the submitted file(s).